top of page

3d Viewer Basics
Navigating

Clicking on this icon in the top-left corner gives you access to the menu
"Save" and "Screenshot" buttons are at the top of the menu. All the other settings can be found under each section.
You can explore most of our available features by double clicking on the model.
Right now, navigating is cellphone friendly. However, adding measurement, markups, and comments are all still best done on a computer, for now.
Double click on a point to zoom to it and set it as a center point.
Right click and drag to rotate around the center point
Left click and drag to move up and down and side to side
Use the center wheel to zoom in and out

2x



Measuring


Most of what you will do with your model is found in the "Tools" section.
To place a point, just click on it and click on the model to place it. You can click on it and drag it to change its location.
For distances, click on the tool, then click on the two point you want to measure. Click and drag each point, until they are where you want.
For height, the placement is the same as the measurement tool, but it will show the vertical distance between the two points.
There are three points to place for the angle tool. It will start to display all angles between points, when you go to place the third one.
The area tool will place as many points as you want and measure the total area between them. Right click to stop placing points.
Be careful! This "X" will clear all measurements
Advanced
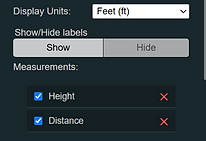
You can hide or get rid of individual measurements, toggle between feet, meters, and inches, and decide whether you want to show or hide the measurements.
Make sure to measure your scale marker first!
If your scale isn't right, you can fix it in the adjustments section.
Volume Boxes and Highlighting


Volume boxes measure the volume inside a cube. You can places them like any other measurement, but manipulating them is different.
When you click on the box you will see a series of lines and points. Left clicking and dragging on the curved lines will rotate the box.
Clicking and dragging on the straight lines will let you move the box in the directions the lines are oriented.
Clicking and dragging on points lets you make the box smaller and larger on the side each point is on.
Clipping boxes are a type of volume box, but you can decide if the parts of the model inside are highlighted, visible, or if you only want to see what is in the box.
Advanced
Unchecking a clipping box makes the box itself invisible, but keeps the effect in place.
Commenting


Placing a comment is like placing a point. Just click on the tool and click where you want it to be on the model. If you want to move it after you place it, just click and drag it to where you would like it.
Click on a comment's title to edit both the title and the description. In the viewer, you can view the description by double clicking on the title.
Advanced
When you save your model and refresh your browser, the comment positions will freeze. This can be helpful if you don't want them moved on accident.
bottom of page